
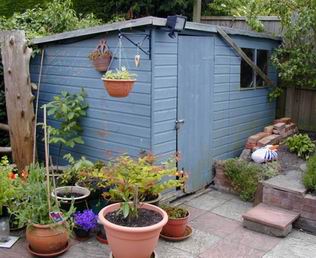
The shed had problems for many years, particulaly the rats that lived there even when we arrived. It also had a tendency to lean sideways, as seen by the strut in the picture.
There was plenty to worry about. To avoid planning permission it should not be too large (total outbuildings should be less than 50% of the 1948 house area), and not too high (less than 2.5 metres if close to a boundary). But the main consideration were our kind and delightful neighbours. Talking to them, we found out that they had been quite upset when the existing shed was re-build within just 0.2 m of their boundary fence so that human access was not practical. They agreed that a much larger ~0.75 m gap would be desirable for us both to have good access to repair the fence when needed.
Mo and I also discussed long what the building was for. The desire for more living area had
disappeared with the new loft room completed in 2015. The need was for a replacement
workshop. It would hold my old 1965 work bench, my "work-mate", all my hand tools and
a secure space for power tools. It would have a nice south-facing gable: ideal for a
solar panel, more battery storage and the opportunity to make a solar-powered small freezer.
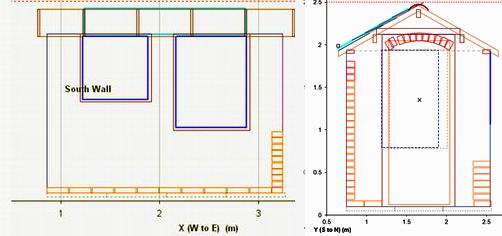
So a new design was made for a modest workshop of size 2.4x1.8 m so just 4.3 m2 in area,
with a gable roof of 2.5 m hight. An EXCEL plan was made leading to a design with a tiled roof of
just 28o which would require slates rather than tiles.
Sourcing the materials had been going on for years. In our neighbourhood, piles of bricks could often be found. I saw one particularly big pile at Whitchurch while parking near the church. Many bootloads came home and were long piled up outside our house. They even appeared at the front of Linda Benton's painting of our family, with the old shed at the back. I did have to spent many hours removing the old concete from the bricks, but in the end I had the 650 or so bricks that I needed.
Other re-cycled bits were three triple glazed windows from Andy and Sarah, two strong hardwood doors
from one of our neighbours, and 28 thick concrete paving slabs from another neighbour.
Then just as lockdown arrived in April 2020, the old shed door fell off! The sun shone and action
began. I made up an A4 sheet of the Workshop plans". On
the aniversary of D day on 8th May 2020, all our neighbours socialised delightfully
with tea and cakes outside our houses. We showed our neighbours our plan and they gave it their
approval, and work began in lovely sunny Spring weather.
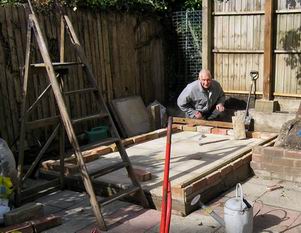
The old shed was constructed from frames of wood nailed together and could soon be dismantled. The best was recycled for later use. the rest turned into firewood which lasted all the winter.
When at last it was down, Mo cleared the stones and sand that had been below the shed into sacks, and miraculously unearthed a large concrete foundation slab. It was some 80mm thick and supplmented by some more poured concrete and topped with the concrete slabs gave us a great base to build on.
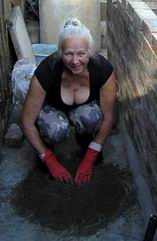
Mo decided that she wanted work finished by the end of August, and that she would help to make that happen. So she found her working clothes and was soon able to mix excellent morter using her own cake-mixing hand style. She also learnt to lay bricks and the early courses went up speedily with the long fine evenings we had in June.
There were plenty of problems. The bricks I had collected came in several types
with slightly different sizes and colours. I made up separate piles of each sort, and decided which ones
would go best on which wall. Although the design had specified 8 bricks wide and 10,5 bricks long, it was
often necessary to use my horrid big angle grinder to cut them to size.

One big purchase was an oak door frame to take the lovely hardwood glased door we had aquired from a neighbour. It was soon made up to size and placed vertically using a long plumbline. Another purchase were some oak strips to make frames for Andy's windows. All three windows were different and frames were constructed around each one. In the end they all fitted nicely.
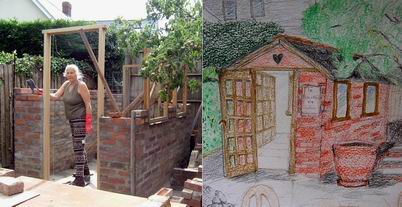
About half way up the bricks was my birthday 28/6/1938. Mo had the idea to paint me a birthday card
of how she dreamed it would look when it was all finished. The original is here
and showed me sunbathing outside with the windows all in and shelves on the back wall. It was so
encouraging when there seemed such a long way to go, to see a vision of it all finished one day!

The walls were rising and the window frames went in. Out pear tree next to the site was have a great crop of fruit. We were very unwilling to cut the overhanging branches down, Some rope tying up the outer branches to the trunk did very nicely!
The walls needed support over the door and big back window. I was surprised cycling round the
new Milton Park development to see many brick arches over windows. I decided to make one. The former
was soon made using quality plywood a neighbour had given me. Quality bricks were chosen and cut to size
and the back arch was done in a morning! The door support was a cast concrete lintel. We had some fun
making a 2020 date inset from cake decorations and old beer bottle tops. They worked very well.

 It was time to make the roof. Nice planed timber was bought and delivered from Travis Perkins,
enough for a 2 wall plates, 2 perlins, a ridge board, 12 rafters, 4 collars, 2 barge boards and
two big pieces of 20 mm thick plywood to go over the rafters and support the slates. Slates were
necessary as the roof pitch was 280 to give a total height less than 2.5 m. The slates
were bought from Ecoslate. They were not cheap In fact they were the most expensive item on the
budget. But they were easily cut with sissors.
It was time to make the roof. Nice planed timber was bought and delivered from Travis Perkins,
enough for a 2 wall plates, 2 perlins, a ridge board, 12 rafters, 4 collars, 2 barge boards and
two big pieces of 20 mm thick plywood to go over the rafters and support the slates. Slates were
necessary as the roof pitch was 280 to give a total height less than 2.5 m. The slates
were bought from Ecoslate. They were not cheap In fact they were the most expensive item on the
budget. But they were easily cut with sissors.
There was a lot of sawing, a lot of "crow's beak" cuts to be made where each rafter was supported
by its perlin. First up were the two roof plates on the North and South sides, then the end rafters,
needed to align with the brickwork, then the two perlins and ridge plate supporting the rafters from
the two gables. Then the eight inner rafters, along with their collars, and lastly the barge boards.
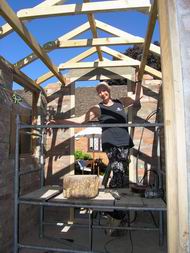
The roof joinery in, a very tricky job came of lifting the 4.2x1.2m plywood sheets into place. I had
sleeepless nights worrying how to do it. In the end they were both raised as high as possible on
piles of bricks, and the rafter ends has a back-stop attached so that they would sit firmly at the
correct height. One of us at each end and they were up!
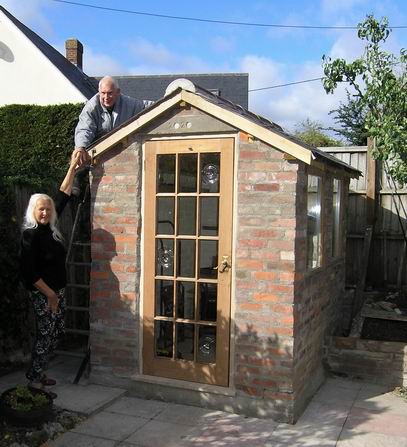
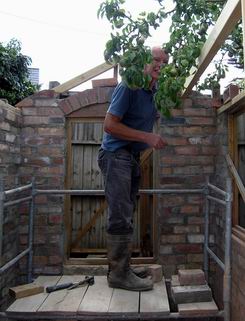
The slates proved very easy to put up. They were nailed to the plywood and spaced so that the nails were never visible. The apex was always going to be tricky! Fortunately with the 280 pitch it was easy to climb over with help from a thick rope tied to the pear tree. The heavy ridge tiles I had picked up from a skip were soon cemented in place and the roof was "topped out" as in the first picture!
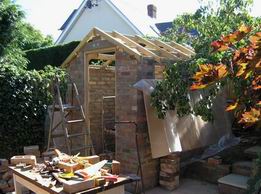
The windows and door went in easily, the walls were painted and we had our first lunch
before the end of August. "Escape to the Chateau" had a "Wellbeing" competition for lockdown project,
whose deadline was also the end of August. I sent off
this entry. It did not win!
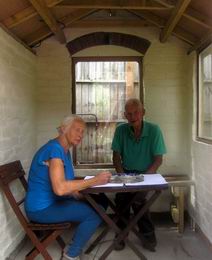
After a delightful camping holiday, it was time to think of the interiors, and the EXCEL plans now included an internal layout. First to be inserted was the big bench seat/cupboard which could fit nicely across the West wall under the big window. There were spare timbers for its frame, a large piece of spare plywood for the lid, and old dark panels from the old harmonium to make the front. The old woodworking bench I had made then fitted nicely below the North window. Mo's brother Michael helped to spruce it up and sand the top surface. My old trusty work-mate took up quite a bit of space when up but fitting nicely next to the bench when folded. Soon the workshop was being used for its proper purpose with all the tools in their own places on the walls and the many shelves.
A new function soon emerged with the resumed lockdown: the workshop doubled really well as a "Work From Home" office. The WiFi worked fine. The worktop was just the right height. The lighting was excellent, with both daylight and a good electric light. It was quiet and peaceful, and easy to work in.
Copyright 2021 Colin Windsor : Last updated 6/2/2021