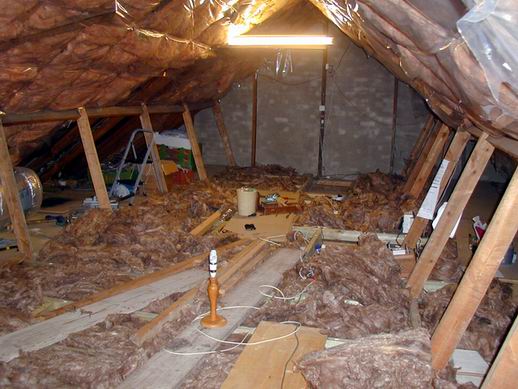

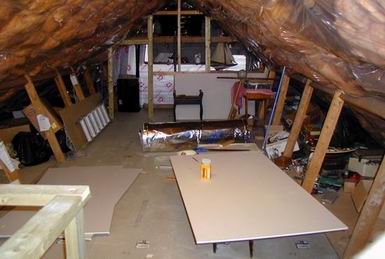
In 2012 the government kindly offered a grant for extra insulation. We quickly accepted, but it had to be done professionally. The loft floor had to be quite clear with no insulation. So all our useful junk was moved to the extra loft we have above the lounge, and I worked hard moving all the existing insulation up to between the rafters of the loft and sealing it up with plastic sheet. The picture shows the loft after the installation on 10/12/2012.
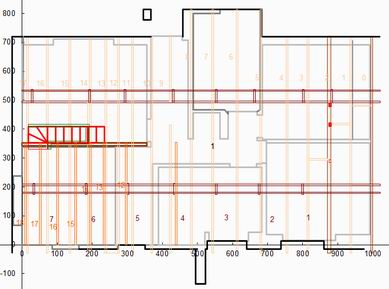
The new insulation was really thick, 200mm or so and would lose efficiency if compressed. Plastic supports for a
new floor were possible but were expensive and flimsy. I decided to buy new 97x47 mm timber joists that could lie
above the existing joists. The plan shows a good feature of our loft: it has 100mm load bearing walls close to the
centre-line of the house along all its length. Attached to the existing joists with big bolts this gave it sufficient
structural strengh to satify the building regulations for floors. It was not to be a habitable room. This would have
required new skylight windows, planning permission and a proper builder.
What we did need was some good stairs. The loft ladder was "not safe for a 75-year old", as I said on the application.
A good spot existed in the front "organ room" where there was just room for a 700mm wide staircase rising directly
from the existing door, and turning left at the top with the last step over the wall and so avoiding the kitchen
space. With a 43o angle and 2m headroom it could satisfy the regulatios.
On 5/10/2013 the Building Control submission was posted off. There were some
conditions to be replied to before approval, but these were accepted: "I have to admit I haver not seen a floor strengthened
in this way before but I can see that it will work." I received permission to start work on 20/11/2013. Things took
a nasty turn when the building control finally came to approve the work. On 15/1/19 the Council offices were gutted
by an arson attack. All the paperwork had apparently been destroyed!
Work began. The big joists had to be cut to length and man-handled up the loft ladder and screwed on to the existing joists. The idea was to make storage areas behind the perlins on both sides. The joists were long enough to go back around a metre so that flooring could be laid over the storage areas.
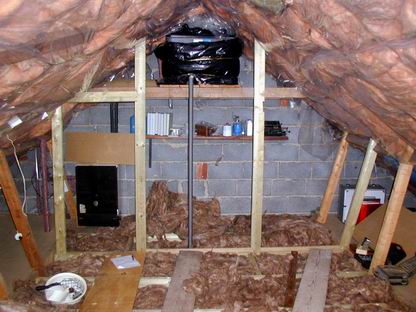
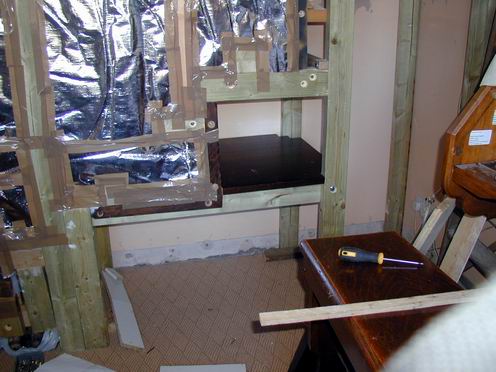
A new "boiler room" was constructed with a plaster wall to hide the gas boiler away. Good quality
loft flooring was bought and it was slowly cut to size and screwed into position.
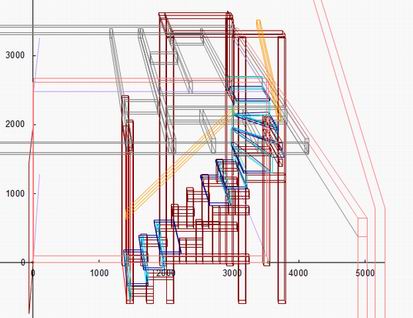
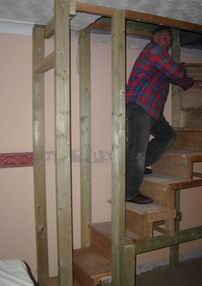
The stair design needed much thought. It had to carry plenty of potential weight so it was supported by
eight vertical 97x47mm members. The centre four of these pieced the ceiling and rose above to form the four corners
of the stair well. The door frame and those next to the north wall went to the ceiling. There were NS braces along the floor
and ceiling, and mandy EW braces to support the stairs. There were three large storage spaces open to the room
that would a large space for my paper cabinet and printer, a smaller storage space next to the printer for more paper,
and a wide space with a large shelf for storing books and files.
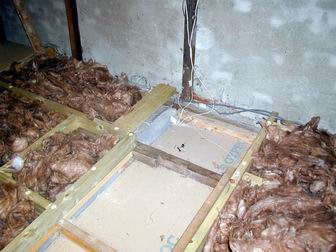
Only with all the stair uprights and extra bracing in place did I think of cutting the big hole in the ceiling to form the opening for the stairs. Extra bracing was put along the joists at either end and new supports on either side. A new suppoting purlin was put above the outer wall of the stairs wall. Only two joists needed to be sawn through. One was only a join between the twp pieces, but it was a tricky moment sawing through the last joints. Nothing moved even a millimetre!
The stairs went up to a corner area with two angled treads and the third, resting on the cut-away wall between the room and the kitchen. Precise drawings were made of all the bits, and the area totalled up 2.7m2.
The stair treads and risers were all purchased from
Dominique at Belleme Bois, the woodyard near our French house.
He was always helpful and let me wander round his yard looking at available oak timbers.
He showed me a really old pile of a sliced up oak trunk. The top was very distorted but the underplanks were good.
It was grey with age but some 28mm thick. I bought three good planks and they fitted fine in the car. I had a good
circular saw in the French house and was able to rough out the pieces in the garden. The resulting pile fitted easily in the car
for the journey home. Back home there was a long job of planing and sanding, but it was so rewarding. The planing revealed
gorgeous oak of a quite different golden colour. (There was some woodworm which was easilu treated and filled). The sanding
gave a really good finish.

Concstruction of the stairs proceeded from the bottom up. It was easy to support each tread on horizontal members screwed on to the inside surfaces of my vertical frame. The circular bit at the top was the most tricky, but the largest oak tread at the base of the spiral made a superb base to support the other treads.
Within the loft the five long uprignts can be seen rising up to form the frame for tbe balustrade. The East side was clad in lovely quality plywood that I had collected long ago from a shop refitting. The other sides were all to be formed from old bookcases.
I had been very worried about heat being lost from the organ room to the draughty loft. I resolved to take several
measures to limit it: to build a proper door at the bottom of the stairs: to insulate the walls and treads of the stairs:
to construct a retractable lid to the stairwell. For insulation I bought 16m2 of SF19 "Superfoil". This is
a 19-layer sandwich of aluminium foil and foam plastic with 2.6 R but only 40 mm thick. It fitted nicely between the
verticl uprights and behind the treads. An old door was cut to the narrow width required and was easy to fit.
The retractable lid proved easy to design and fit. A frame of timber and plywood was made and filled with insulation.
It fits neatly into the ceiling height of the stairs, and has a simple push catch to hold it in place. Its used in
winter, but not neeeded for most of the year.
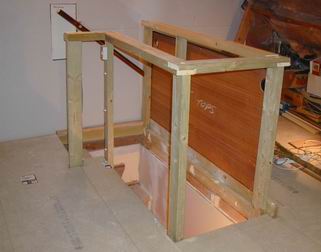
The stairs were finished with plasterboard which turned into a great display space. Its now used for storage of paper
and card. My printer sits nicely on top of a cupboard in the alcove. The old ceiling coving had to be
removed for the stairs but was replaced in the room,
Copyright 2021 Colin Windsor : Last updated 6/2/2021